
Hi all – thanks for clicking the link and giving this a read. Initially I was going to create a before and after for my “Nourishing Nail Treatment” but as is my way, have ended up going a bit OTT crazy, so heres a bit more detail about what I did and why.
In short the treatment covers: consultation, dry cuticle preparation, IBX Repair treatment, IBX Strengthening treatment, gentle file and shape, apply cuticle oil and massage to finish.
Clients – just know theres a lot of information below and that this treatment works wonders.
Fellow Nail Techs – read on there is so much great information here, plus a little something which I feel we should set a trend with ha ha 🙂 #desquamies
Heres what we started with:
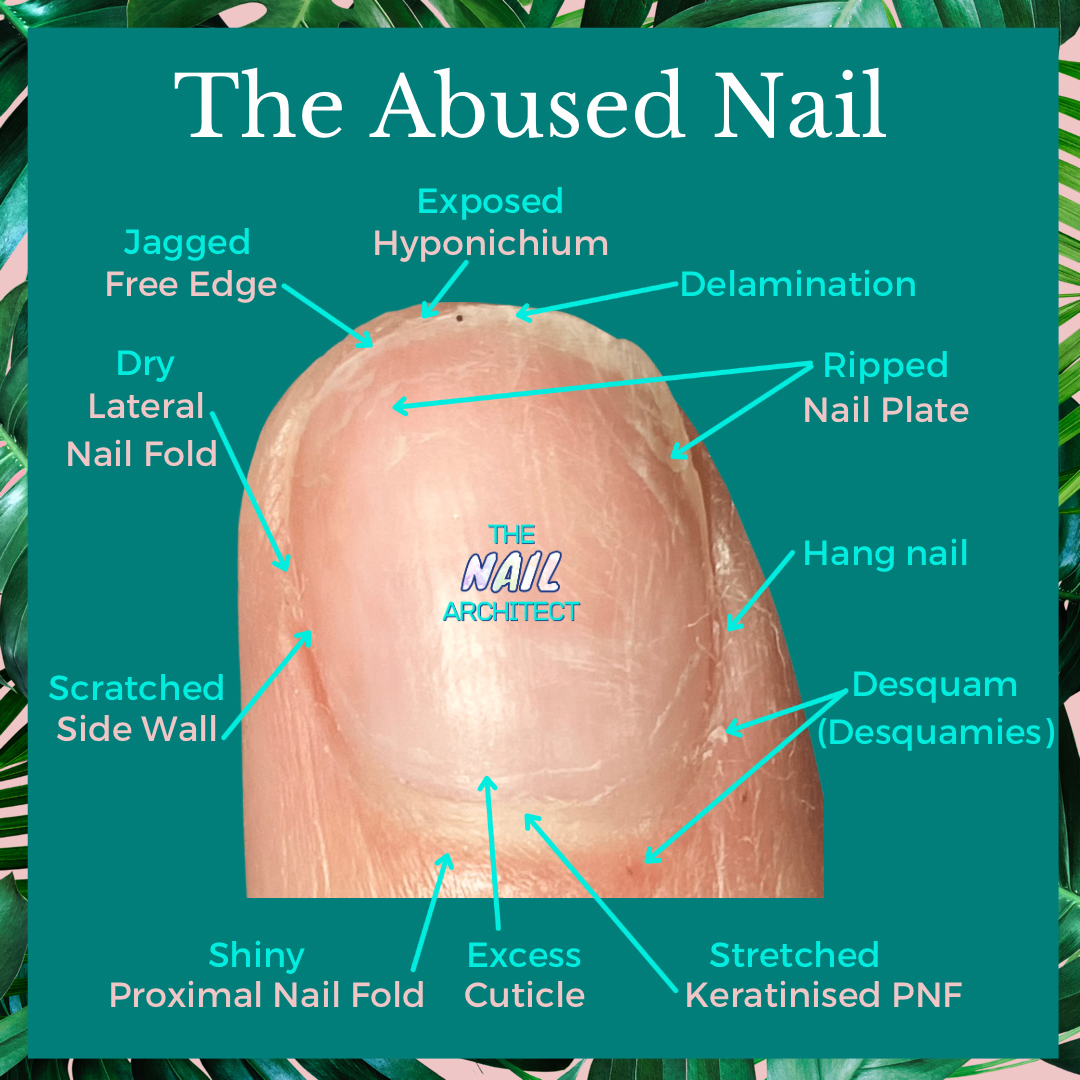
The light pink writing shows the actual label and the turquoise the problematic characteristic.
Excess Cuticle – this isn’t a problem in its self. Many people have cuticle that grows very far up the nail. Cuticle tissue is absolutely needed as part of the nail as it protects the soft nail plate as it grows up and out underneath the nail fold. It acts as a seal to stop any pathogens like bacteria getting into the body. However it is absolutely no use to leave it there and apply product on top of it, why, because it will cause the product to lift and gives a very un even finish. The excess cuticle tissue on the nail plate needs to go, but needs to remain intact under the PNF in order to keep the seal and protection in place. The other detrimental cause it has is that by growing too far up the nail plate it drags the keratinised proximal nail fold with it. Read on to find out more…
Stretched Keratinised Proximal Nail Fold – this is an interesting section. The keratinised PNF is a relatively new addition to be studied in the nail anatomy world. It has been proven and decided by the likes of Doug School and Vitaly Solomonoff that this is still part of the PNF as a result is living tissue. So where as we once thought we could remove it without any damage – we were wrong! It is the stratum corneum of the proximal nail fold thickening its self with more keratin in order to protect the rest of the PNF from damage. The more damage you do to the PNF the longer the cycle of keratin production will be. So, what not to do is cut it. Instead we push it back and remove any excess remaining cuticle tissue thats attached and oil regimentally. If we do this for at least 40 days we can break the cycle (which leads on to my 40 day cuticle challenge, not discussed in this blog). This means that the keratinised PNF is adding another element of protection to our nail structure and although we want to keep it as thin and supple as possible by letting the cuticle over grow as above it is stretching the keratinised PNF which can lead to more keratinisation (hardening) making it harder to push back and reduce with regular oiling. It also means that the rest of the PNF is stretched and flattened, which leads to…
Shiny Proximal Nail Fold – by the PNF being flattened and stretched from the cuticle and keratinised PNF the stratum corneum of the PNF becomes thinner and shinier. You’ll notice it also seems to become more red. Once the stratum corneum of the PNF can’t stretch any more it rips and tears. Which leads to …
Desquarm (Desquarmies) – well you will have never heard of these before. The simple reason being is that they don’t actually have a specific name. Most people will call them hang nails, however as they are not hardened skin or occurring at the lateral sides of the nail plate, they (in my mind) simply can not be classed as hang nail. So what exactly are these annoying bits of peeling skin? I’d like to say simply put, but that would be stretching the truth a little (get stretching the truth / stretching the PNF, I have to make myself laugh). They are the result of desquamation of the stratum corneum. Which means the peeling of the top layer of skin. This is why I have come up with the term “desquam” singular or “desquamies” plural. It just sounds so much fun to say, ha ha. So whats the solution? Well this hurt a lot when caught, like paper cuts, oh so painful for such a little thing. Any desquamies around the dorsal end of the nail plate need to be trimmed. Then to make sure the problem doesn’t keep re occurring you guessed it, you need to oil regularly.
Hang Nail – This is a piece of hard skin found to be peeling away at the lateral side walls of the nail plate. I often find clients pick at these, which hurt like heck but then also rip further down causing bleeding and again opening the nail plate and body up to infection. It is important to carefully trim this down and oil like crazy to avoid this from reoccurring.
Ripped Nail Plate – now admittedly I caused the rips on the left hand side of the nail plate to show why you should not rip, bite, pull or forcibly remove nail products from the natural nail. I feel clients like this visualisation so they can clearly see. In the grand scheme of nail rips through through the above these are fairly minor and how clients can do this to them selves is beyond me as it blinking well hurts. Clearly you are ripping you natural nail plate apart, weakening it which can lead to all sorts of problems which I won’t go into now. The other rip on the right hand side is from me actually doing manual labour and catching it. This is too low to remove without damaging my nail. So again IBX repair treatment can help fuse these rips and tears back together giving the nail plate its much needed strength back, whilst providing a smoother surface for us to work on.
Delamination – There is only a small amount of delamination on the nail which is good news. This occurs when the top layers of nail plate separate from each other and make the nail very flimsy. The IBX repair treatment works wonders for this as it fuses together the top layers. We are then able to shorten the nail and allow it to grow out. Previously techs have been taught to file the delaminated layer away, however this obviously leaves the nail weakened and by allowing the two parts to rejoin again provides more strength for the nail. Keep oiling so that the nail plate does not become dry and brittle and lessens the chance of it splitting again.
Scratched Side Wall – We want the nail plate to be as healthy as possible. I had not intended to scratch the nail plate and side walls as much as shown in the picture but re organising the attic and moving half my daughters bedroom around meant I was bashing them and scratching them all over the place. The good news is I cam use IBX repair to fill in the scratches. Without this my nail plate would be left thinner and weaker which is not ideal. Do also remember that its only the top 10% and bottom 10% of the nail plate that is particularly firm. So if you scratch off too much your going to be in pain and a whole world of trouble as nail products won’t stick as well to it.
Exposed Hyponichium – As we hopefully know the hyponichium is one of the seals that protect bacteria from getting between the nail plate and finger at the free edge. When nails are broken this can often rip or tear the hyponichium opening it up to infection. In this instance the seal hasn’t been broken as such, as the nail hasn’t ripped too far down. However as my fingers are usually to be found with long nails I usually have quite a high hyponichium so when they do break this becomes exposed and is very sensitive. It has also become dry due to a lot of hand sanitiser and a lack of oil which it would usually get from the nail plate. The best thing we can do it to hep keep it hydrated whilst the nail grows back up again and the best way to do that is by using an excellent quality cuticle oil. Things not to do are push it, cut it, rip it, bite it (oh yes I’ve seen people do that) or try to adjust it. Simply leave it alone and oil.
Jagged Free Edge – the free edge of the nail in this instance has been caught, snagged and ripped making it very jagged. This is turns means that it catches on more things and rips some more. But as we’ve seen the hyponichium has already been exposed, to break the nail further would quite likely cause bleeding, leading to us once again opening our bodies up to infection. The solution is easy, use a 240 grit file to gently shape. No fast see saw actions please. Then finish in a downward motion to seal the free edge
Dry Lateral Folds – So many of us are getting over dried lateral folds at the moment. We usually see this more in the winter months due to the cold, however with the added constant use of hand sanitiser we are seeing it more. Its not overly a problem but can lead to more hang nails which is not ideal. Can you guess what the solution is…? OIL
So now we see all the problems that this nail has, it’s time to fix it. The above would all be noted by taking a picture and attaching it to my clients file so we can see where we started during the consultation. (As mentioned I have purposely abused this nail for demonstration purposes. I did consider over filing, but the potential ramifications of that one seemed too great to add into this mix and will probably be discussed another time.)
Following the consultation (assuming we can continue with the treatment) I tidy up the cuticle and PNF area (there will be a later blog on different ways of prepping in the upcoming weeks). This is then followed by the IBX repair treatment ensuring that the top layers of nail plate are fused together to allow a stronger smoother surface. The IBX strengthen treatment is then applied to allow further strengthening into lower layers of the natural nail plate. The more this step is carried out the stronger the end result will be. However it is not recommended more then once per week. (I repeat this step again at the first treatment.) Once Ive strengthened up the nail plate I gently file to shape and apply cuticle oil. A massage is then performed to give an extra level of hydration and luxury for the client.
Heres the results:
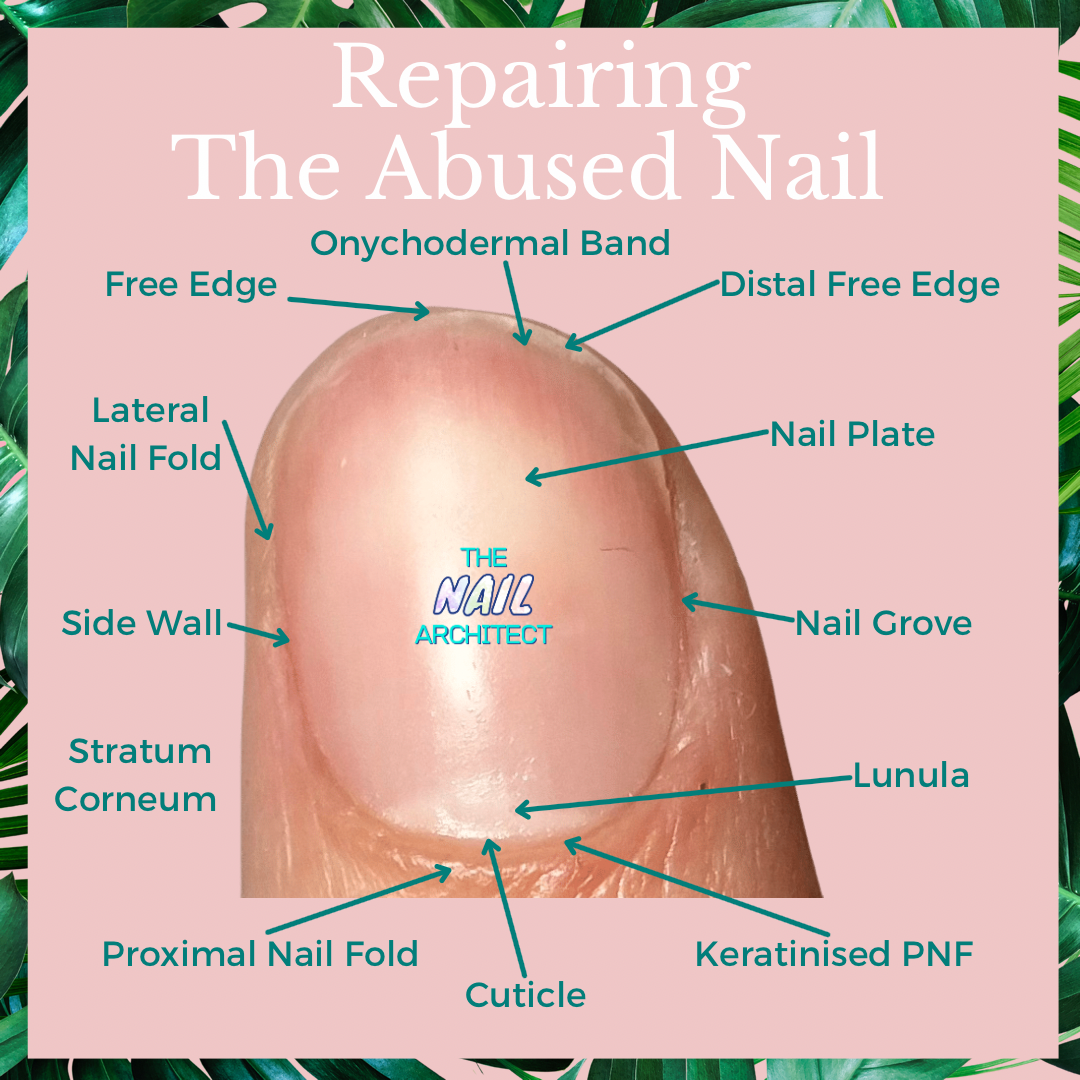
As you can see the scratches have been repaired and even the tear has been fused back to the nail plate, I would recommend a further treatment be added to give it strength whilst it grows out further. The cuticle has been removed from the exposed nail plate and both parts of the PNF have been pushed back leaving a healthy strong keratinised PNF. You can now see just how over grown the cuticle was due to the exposure of the soft Lunula. The stratum corneum around the nail fold and PNF has now reduced in shine and redness. But most importantly the nail structure is now well hydrated.
In summary – OIL, OIL, OIL 🙂
I hope youve found this helpful. Come back next week for another blog. 🙂